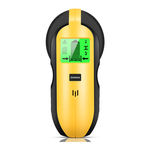
the metal and AC wires. This item features four scanning modes:
• Stud scan: Locates the center and edges of wood and metal studs up
to 0.75 in. (19 mm) deep.
• Deep mode: Locates the center and edges of wood and metal studs up
to 1.5 in. (38 mm) deep.
• Metal scan: Detects metal (such as 1⁄2 inch rebar) up to 2.36 in. (60
• AC scan: Detects live unshielded AC wires up to 2 in. (51 mm) deep.
There is no battery in the tool. Please install the battery firstly
Push the battery cover at the bottom of the tool and open it. Insert a new
9-volt battery. Snap the battery into place and close battery cover.
Low Battery Indicator: The Low Battery Indicator icon displays when the
battery level is getting low.When the low battery indicator icon appears on
the screen, the battery level is too low and not sufficient to power the tool
for proper operation. Please replace the 9-volt battery with a brand new
battery immediately.
1. The Marking Point
2. AC Wire Warning
3. Stud Mode Indicator
4. Low battery Indicator
5. Metal Mode Indicator
6. AC Mode Indicator
7. Stud Deep Mode Indicator
8. Moving Direction Indicator
9. Stud Edge Indicator
10. Stud Center Indicator
11. Power Button/Mode Switch Button
12. Scan Button
13. Battery (Back of Unit
Please note:
1. Press the mode button (NUMBER 11) to choose the mode.
2. Press the scan button on the side of the tool (NUMBER 12) to calibrate
the tool. After calibrate it, you don't have to pressing the scan button
all the time when scanning the wall
Use this stud scan mode to find the center and edges of wood or metal
studs up to 3/4 inches (19 millimeters) deep. For best results, always start
in this mode when looking for studs.
Step 1: Press the mode button to choose the "stud mode"
Step 2:Put the scanner on the wall and Press the Scan Button on the
side of the tool to calibrate. After a short beep sounds, confirming
calibration is complete.
Note: Be sure not to move the scanner while calibrating.
Calibrate the tool on the wall before every scan.
Step3: Move it flat against the wall to scan.
Note: If it finds metal or wooden stud, the screen will show as the picture
and it beeps.
If it finds nothing, please repeat the above steps ( calibrate it and move it
Step4: Find the edge and center of the stud and mark it.
WireWarning detection works in all modes. The indicator flashes on
the screen when detecting a live, unshielded wire.
Factors like humidity, temperature, and even the minor electric
readings from your hand, which all have an impact on the readings from
3. If Stud Scan Mode provides irregular readings, the wood or studs
might be behind deeper than 0.75 in. (19 mm). Slide the Mode Selector
Switch to Deep Scan Mode.
Deep scan mode doubles the scanning depth of wood stud and metal
stud to 1.5 in. (38 mm) deep and allows for increased accuracy on deeper
Step 1: Press the mode button to choose the "Deep mode"
Step 2: Put the scanner on the wall and Press the Scan Button on the
side of the tool to calibrate. After a short beep sounds, confirming
calibration is complete.
Note: Be sure not to move the scanner while calibrating.
Calibrate the tool on the wall before every scan.
Step 3: Move it flat against the wall to scan.
Note: If it finds metal or wooden stud, the screen will show as the picture
and it beeps .If it finds nothing, please repeat the above steps ( calibrate it
on a new place on the wall and move it to scan)
Step4: Find the edge and center of the stud and mark it.
1. WireWarning detection works in all modes. The indicator flashes on the
screen when detecting a live, unshielded wire.
Table of Contents
Stud center finder, metal and ac live wire detector (4 pages)